Pinned locations make hard-to-find documents ready to hand.
I have documents I use daily and those that I use monthly. Those I visit on a daily basis I can find  without problem – usually. But those that I use less frequently can sometimes tax my memory! Where did I store that? In my general Databases folder? Or in the specific Newsletter folder? And only when I’m busiest does this happen with greatest frustration. Like brain power, already partially drained, which cannot remember a common location when the need is urgent, is the finding of the document you put in a special place so you’d find it! If you want to avoid such a hassle, then this tip on pinned locations will help you… twice!
When using Microsoft Office (Office 365), there are two ways that you can create pinned locations for a document that you frequently or routinely use. Avoid the struggle to remember as you try to hunt it down each time. The pinned location comes to your rescue regularly.

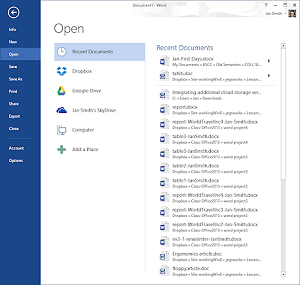
The first source of pinned locations is in the program itself. Take, for example, Word. When you open Word, you may commonly go to the Open page to find your document. By the way, there are three ways to get to the Open page! You can keystroke with Ctrl+O – for Open; you can use Alt+F – for File (Open link in left column); or you can simply click on the File tab in the ribbon. All three take you to the Open page.
You have probably noticed on the left of the Open page that there are links to browse your computer to find the document you want. On the right there is a list of Recent Documents. That list can show from 0 to 50 of your most recently used documents. This can be very helpful!
However, what if you could keep the most routinely used at the top of the recently-used list? Used once a week or once a month, a document can drift down the list. The list shows the most recent in order of last use. So to keep your favorite document at the top, you take these simple steps to make it a pinned location.
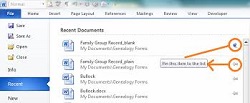
- First, highlight the document by rolling the mouse over the document title without clicking (clicking will open the document). You will be able to see at the right edge of the highlight a horizontal pin.
- Next, click on the horizontal pin and the document will be “pinned” to the top of your list. You have created a pinned location!
- The document will stay in the top section month after month, until you once again click on the pin (now vertical) to unpin the document from the list of recently opened documents.
There is another way you can identify and access your favorites by making them pinned locations.
- First, pin the Word icon (or any of the other Office icons) to the Task Bar.
- Go to the start button to find the Word program icon.
- You may need to search by using the small search square in the top right corner.
- When you find the Word program icon, right click on it and choose, Pin to Task Bar.
- Now you are set up to create more pinned locations.
As you use documents in Word, the start icon on the Task Bar will also keep track of documents recently used! By right clicking on the program icon in the Task Bar you will see the familiar Pinned and Recent locations as in the Open page.
Again, you can roll over the document title (without clicking) to see the horizontal (unpinned) or vertical (pinned) icon. The program icon on the Task Bar is a great navigational tool when you have several Windows open.
Here’s some important information to keep from being at the mercy of you pinned locations. You know what will happen. You are so used to conveniently using the pinned location, that you forget the original location! What should you do if you ever have the need to go to the original folder? To be reminded where your pinned location document is actually stored?
Instead of clicking on the pinned location, hover over it with the mouse and you’ll see the actual path. This is true whether from the Task Bar or from the Open page. You may need to jot the path down. My experience was that if I let go of the mouse (didn’t move it) the box with the path would stay open for about 4 seconds – long enough to get the major direction down. Scribble quickly! Or just hover again.
In case you really get into pinned locations where you can find documents easily, you may want to increase the number of recent or pinned documents the Open page will maintain. You’ll need to open the program (Excel, Word etc.), and then choose File/Options (Alt+F + T).
Select Advanced from the links in the left column. Scroll to the Display section (more than half way down). The first item under Display allows you to set the number of documents to be displayed in the Recently used storage. The default is 10, but you can put in any number from 0-50.
Just below the setting for how many documents to be displayed there is a check box for Quick Access. This allows the top four of your pinned locations to be placed in the side-bar of the Open page. If you press the Alt key, the four documents will be numbered (1-4) and can be accessed by pressing the numbers 1, 2, 3 or 4. Depending on which document you desire. Nice! Of course, you could always reach for the mouse and click. But Alt+3 or Alt+1 is Quick Access!
One final tip. Now that you have learned to put documents into a pinned location, keep your eye out for the opportunity to grant pinned location status to a Folder! With Word already open, go to the Open page and start your document search by clicking on the Computer link. You’ll be given a list of folders. At that point, you know the drill! Highlight and pin. Great work! You are now a master of pinned locations.
An online procedure for pinning a Folder to the Taskbar may give you further help and insight into the matter of pinning for convenience.
